

Hey there! As a butterfly valve supplier, I've installed tons of these valves over the years. Today, I'm gonna share with you a step-by-step guide on how to install a butterfly valve. Whether you're a DIY enthusiast or a professional plumber, this guide should come in handy.
Step 1: Gather Your Tools and Materials
Before you start the installation process, you need to make sure you have all the necessary tools and materials. Here's a list of what you'll typically need:
- Butterfly valve (obviously!)
- Wrenches (adjustable or socket wrenches depending on the valve and piping system)
- Gaskets (make sure they're the right size and material for your application)
- Sealant (if required by the valve manufacturer)
- Pipe cutter (if you need to cut the pipes to fit the valve)
- Measuring tape
- Safety gear (gloves, safety glasses)
Step 2: Prepare the Pipes
First, you need to prepare the pipes where the butterfly valve will be installed. Use a measuring tape to measure the length of the pipe section where the valve will go. If the pipe is too long, use a pipe cutter to cut it to the appropriate length. Make sure the cut ends of the pipes are clean and free of any burrs or debris. You can use a file or sandpaper to smooth out the edges if needed.
Step 3: Inspect the Butterfly Valve
Before installing the valve, it's crucial to inspect it for any damage or defects. Check the valve body for cracks, dents, or any other signs of damage. Make sure the disc moves freely and the stem rotates smoothly. Also, check the gasket surfaces for any scratches or irregularities. If you notice any issues, contact your supplier immediately to get a replacement.
Step 4: Install the Gaskets
Place the gaskets on both sides of the butterfly valve. Make sure the gaskets are centered and aligned properly with the valve and the pipe flanges. If the valve manufacturer recommends using sealant, apply a thin layer of sealant on the gasket surfaces before placing the gaskets.
Step 5: Position the Butterfly Valve
Carefully position the butterfly valve between the prepared pipe sections. Make sure the valve is aligned correctly with the pipes and the bolt holes match up. You may need to use a little force to get the valve in place, but be careful not to damage the gaskets or the valve itself.
Step 6: Insert the Bolts
Once the valve is in position, insert the bolts through the bolt holes in the valve flanges and the pipe flanges. Make sure to use the correct size and type of bolts as specified by the valve manufacturer. You can use a wrench to tighten the bolts slightly, but don't fully tighten them yet.
Step 7: Tighten the Bolts
Start tightening the bolts in a crisscross pattern. This helps to ensure even pressure distribution and prevents the valve from being misaligned. Tighten the bolts gradually, alternating between them, until they are all snug. Be careful not to over-tighten the bolts, as this can damage the gaskets or the valve flanges.
Step 8: Check the Valve Operation
After tightening the bolts, check the operation of the butterfly valve. Open and close the valve a few times to make sure it moves smoothly and the disc seals properly. If you notice any issues with the valve operation, such as binding or leakage, you may need to loosen the bolts slightly and re-align the valve.
Step 9: Test for Leaks
Once you're satisfied with the valve operation, it's time to test for leaks. Close the valve and pressurize the piping system. Check for any signs of leakage around the valve flanges and the valve body. If you notice any leaks, tighten the bolts a little more or replace the gaskets if necessary.

Different Types of Butterfly Valves and Their Installation Considerations
There are several types of butterfly valves available in the market, each with its own installation considerations. Here are a few common types:
Double Offset Lug Type Butterfly Valve
The Double Offset Lug Type Butterfly Valve is designed with two offsets, which helps to reduce friction and wear on the valve seat. When installing this type of valve, make sure to align the lugs properly with the pipe flanges. The lugs are used to secure the valve between the pipes and prevent it from moving.
Triple Offset BW End Butterfly Valve
The Triple Offset BW End Butterfly Valve features three offsets, which provides a bubble-tight seal and excellent flow control. This type of valve is often used in high-pressure and high-temperature applications. When installing a triple offset BW end butterfly valve, pay special attention to the welding process. Make sure the welding is done by a qualified professional and follows the manufacturer's specifications.
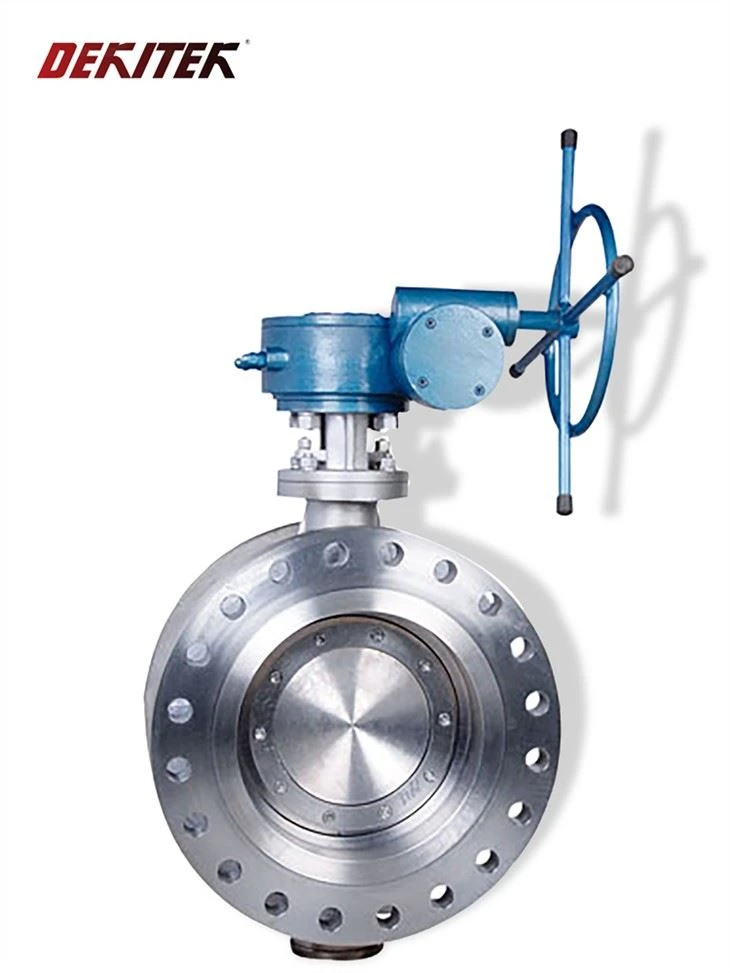
Triple Offset Flange End Type Butterfly Valve
The Triple Offset Flange End Type Butterfly Valve is similar to the BW end valve but has flange connections instead of butt-welded connections. When installing this type of valve, make sure the flanges are properly aligned and the bolts are tightened evenly.
Conclusion
Installing a butterfly valve may seem like a daunting task, but if you follow these steps and take the necessary precautions, it can be a relatively straightforward process. Remember to always refer to the valve manufacturer's installation instructions and guidelines for specific details. If you have any questions or need further assistance, don't hesitate to contact your butterfly valve supplier.
If you're in the market for high-quality butterfly valves, we've got you covered. Our company offers a wide range of butterfly valves, including the ones mentioned above, at competitive prices. Whether you need a valve for a small residential project or a large industrial application, we can help you find the right solution. So, if you're interested in purchasing butterfly valves, feel free to reach out to us for a quote or to discuss your specific requirements. We're always happy to help!
References
- Manufacturer's installation manuals for butterfly valves
- Industry standards and codes related to valve installation